home Photobucket about Photobucket featured Photobucket favorite posts

Monday, May 30, 2011

Moss Basket Tutorial

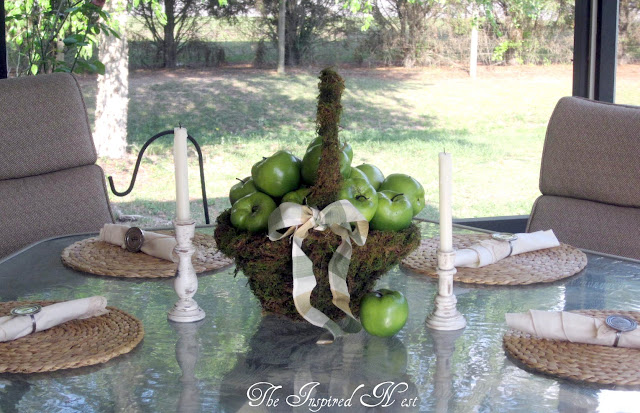
I have had some requests on how I actually did the Mossy Basket on my porch.
This turned out to be so easy.  I wish I would have attempted it sooner!


I started out with a cheap basket.  I wanted one with a large handle simply because I knew the volume of the moss would make the basket look smaller.

I painted the basket black so that any bare spots would not be as noticeable.


I used moss that comes in a bag.  The moss is folded into a ball. 
You have to unroll the moss and tear into the size pieces you need. 
 I used Elmer's Craft Bond spray adhesive to attach the moss. 


I sprayed small sections of the basket with the adhesive (it is very sticky) and then placed the pieces of moss on to the basket.  What you see above is 2 sections.   I did use 2 bags of moss for this basket.  Notice I didn't paint the bottom of the basket.  You will not see this.


Here you can see the embroidery floss that I have weaved all over the basket.  I did this to help hold in the moss.  The adhesive does a good job of keeping the moss on the basket but the moss has a mind of it's own and puffs up after while.  I did spray more adhesive over the entire basket at the end to help control fly aways (just like you would with you own hair with hairspray).  I did a sloppy job of wrapping the floss around because it was not the easiest to get done.


The moss is on the inside as well. 
I couldn't find a happy stopping place that I thought looked good. 
I was very happy with the way it came out.


The ribbon is a stripe of fabric I had left over from another project. 
 I found the apples at Tuesdays Mornings.  Place mats are from Ikea.

Enjoy!
Thursday, May 26, 2011

Mossy Baskets

I have wanted to knock off the Pottery Barn's Moss covered
baskets that they featured around Easter time. 
I like the organic feel of these baskets. 
I have been trying to find a cheap basket to experiment with. 
I found one today for a buck.
Some black acrylic paint, 2 bags of moss, spray adhesive and some embroidery floss
 and I had a pretty good knock off.


I painted the basket so that the pink color wouldn't show through.
I used acrylic paint simply because I didn't have any dark spray paint on hand.


Here you can see how I wrapped the embroidery floss around the handle. 
It really helped hold the moss on.

Perfect for a fun centerpiece on the porch table.
I am sure I will have a plant in there soon.

Let me know what you think!

** Tutorial is up!  Visit HERE to get the step by step instructions**

I am linking up with:


Monday, May 23, 2011

China Cabinet Vignette

Happy Monday everyone!  I hope your week is getting off to a great start. 
 I wanted to show you my best thrifty find to date.  I found this large tole painted
(I think?) tray at Goodwill one day for $1!!!!  It is rusted in spots, the edges are beat up but I thought it was pretty cool looking.  My original intention was to make the tray into a chalkboard.  Once I got it home I put it in a few places to get a feel of the size and I knew it would not be touched!  I loved the pheasants, the folksy type flowers & grapes and how the black tied the frames surrounding the china cabinet.


My Pottery Barn knock offs found a good home here.

Here is the big picture of what I see from the kitchen. 
I think those brown chairs need to be green?  What do you think??


I am linking up with:

Monday, May 16, 2011

Spray Paint & Green Apples


Sometimes you find quality accessories at Goodwill.  Sometimes you question whether or not a piece is worth the time you may have to put in it. 
This is a story of one of those times.   

 I found this large planter that was filled with floral foam covered in moss.  The moss was sticky feeling and all of it was attached heavily with hot glue.  But the size and shape was perfect.  I wanted a basket weave dish to put on my coffee table.  I have been looking and had just about broke down and purchase a bread bowl from Williams Sonoma that I had been wanting.  I knew that I wanted green apples to place in this bowl. 

Accessories on my coffee table get thrown to the ground by my sweet fat cat. Fifi thinks she owns the joint and my decorating gets in the way of her lounging.  The size of this container was perfect. 


After numerous coats of white spray paint it now looks like this:


I purchased the faux green apples from Tuesday Morning in the clearance section. 
There is still plenty of room for Fifi to relax. 
My kids keep wanting to play with the apples.  They look real. 

I paid $4 for the planter and $12 for the apples. 
 I had the spray paint on hand from another project. 
 $16 really brightens the room.

Lacy


I am linking up to:

Sunday, May 15, 2011

A little thrifty treasure!

Coasters are a necessity at my house.  We use them and abuse them!  I have numerous types that we rotate through but I am never happy with their performance.  A napkin always comes into save the coasters day from all the condensation.  I have been wanting some with a large cupped edge. 

I ran into the Hospice thrift store in town one day and found 6 coasters that hopefully with do the trick!  Not only were they what I wanted they were pretty.


The bottom of the coaster comes off so that you can put your own fabric in them. 
This is the ugly velour fabric that was in them.  Ughh!

I decided to use these fabrics in the coaster.


I love the way they stack

Perfect!  And they really do a great job.  Not to shabby for $2!

I am partying with:

Lacy